
Reach it from outside (HTTPS)
This page makes your server reachable from anywhere (on mobile data, at work, at a friend’s) with an https:// address, such as https://music.example.com. It is for the person who runs the server. Choose one of the four ways below.
Why HTTPS
Section titled “Why HTTPS”- Your password travels with every sign-in, and many Subsonic apps send it (or a token made from it) with every request. Without HTTPS, anyone on the way (public Wi-Fi, your operator) can read it.
- The Android app refuses plain
http://for any address outside your home network. - The web player on an
https://page cannot talk to anhttp://server: browsers block it.
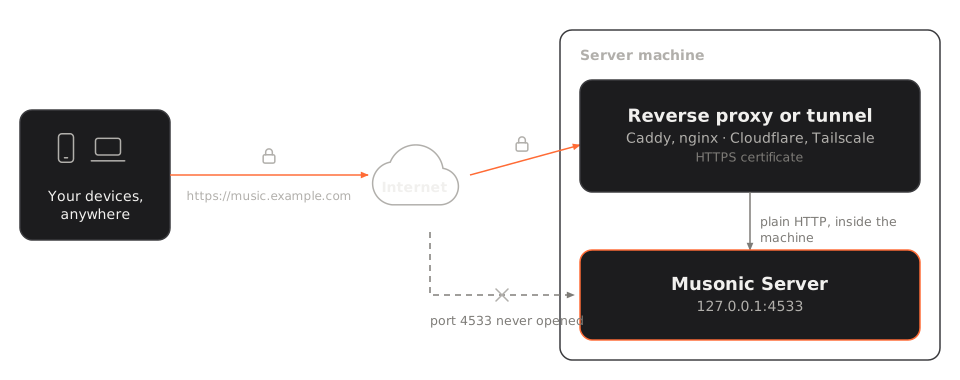
The server itself listens in plain HTTP, only on the machine (127.0.0.1:4533). Something in front of it handles HTTPS: a reverse proxy (Caddy, nginx), a tunnel (Cloudflare), or a private network (Tailscale). It runs on the server machine and passes the requests to 127.0.0.1:4533 in plain HTTP; port 4533 itself is never opened to the internet.
Which way to choose
Section titled “Which way to choose”| Way | You need | Good for |
|---|---|---|
| Caddy | A domain name, ports 80 and 443 open on your box (router) towards the server. | The simplest reverse proxy: it gets and renews the certificate on its own. |
| nginx | The same, plus certbot for the certificate. | You already use nginx. |
| Cloudflare Tunnel | A domain name managed by Cloudflare, a free Cloudflare account. No port to open. | Your box cannot open ports (4G box, shared connection, CGNAT). |
| Tailscale | Tailscale on the server and on each device. No domain, no port to open. | Only you and a few people, never public. |
What the proxy must pass
Section titled “What the proxy must pass”Whatever you choose, check these points. The configurations below already do it.
| Need | Why |
|---|---|
WebSocket on /v1/events |
Live sync between your devices (a like on the phone shows on the computer at once) and Musonic Connect go through a WebSocket. The server sends a ping every 30 seconds, so a proxy that closes idle connections after 60 seconds or more is fine. |
| No buffering of audio | Songs, and above all songs made lighter by ffmpeg, are sent while they are read or converted. A proxy that waits for the whole file before sending it delays playback. |
Range requests |
Seeking in a song asks for a part of the file. Proxies pass it by default: do not remove it. |
| The client’s address | The server limits wrong passwords per address (too many block it for a while). It reads the address from CF-Connecting-IP, then the first address of X-Forwarded-For, but only when the request comes from a proxy it trusts: this machine or a private network by default (MUSONIC_TRUSTED_PROXIES). Your proxy must set these headers itself, never pass on what the visitor sent, or anyone could pick the address that gets blocked. |
| Request size | No request to the server carries a large body (there is no upload through the apps): the default size limits of proxies are enough. |
The server already adds the browser protections it needs to its answers (X-Frame-Options, Referrer-Policy…): do not add others that would block the console or the web player.
Before you start: your domain
Section titled “Before you start: your domain”For Caddy and nginx:
-
Point your domain to your home.
At the company that manages your domain, create an
Arecordmusic.example.com→ the public IP address of your home (and anAAAArecord for IPv6 if you have one). If that address changes, use a dynamic DNS service. -
Open ports 80 and 443 on your box, towards the server machine.
In your box’s settings (“port forwarding”, “NAT/PAT”), send TCP 80 and 443 to the local address of the server (for example
192.168.1.20). Do not open port 4533. -
Check the domain answers.
Terminal window ping music.example.comThe address shown must be your home’s public address.
Caddy gets a free certificate (Let’s Encrypt) on its own and renews it, and passes WebSockets without settings.
-
Install Caddy on the server machine.
Follow caddyserver.com/docs/install for your system (Debian and Ubuntu: the official
aptrepository; Fedora:sudo dnf install caddy; Arch:sudo pacman -S caddy). -
Write
/etc/caddy/Caddyfile.Terminal window sudo nano /etc/caddy/CaddyfileReplace its content with the file below, with your domain.
-
Reload Caddy.
Terminal window sudo systemctl reload caddy -
Open
https://music.example.comin a browser.The console’s sign-in page opens, with a padlock in the address bar.
/etc/caddy/Caddyfile:
music.example.com { encode zstd gzip reverse_proxy 127.0.0.1:4533 { # Send audio as it comes, without buffering. flush_interval -1 # Only Cloudflare may set this header: remove what visitors send. header_up -Cf-Connecting-Ip }}| Line | Why |
|---|---|
music.example.com { |
Your domain: Caddy gets its certificate and redirects http:// to https://. |
encode zstd gzip |
Compresses text answers that the server did not compress already. |
reverse_proxy 127.0.0.1:4533 |
Passes everything to the server. Caddy sets X-Forwarded-For to the real visitor’s address, and passes WebSockets. |
flush_interval -1 |
Sends audio right away. |
header_up -Cf-Connecting-Ip |
See What the proxy must pass. |
If something goes wrong: journalctl -u caddy -e shows Caddy’s errors (often: the domain does not point to you yet, or port 80 is closed, and the certificate cannot be obtained).
-
Install nginx and certbot.
Terminal window sudo apt install nginx certbot python3-certbot-nginx(Debian, Ubuntu. Other systems: certbot.eff.org.)
-
Get the certificate.
Terminal window sudo certbot certonly --nginx -d music.example.comIt puts the certificate in
/etc/letsencrypt/live/music.example.com/and renews it on its own. -
Write the site’s configuration.
Terminal window sudo nano /etc/nginx/conf.d/musonic.confPaste the file below, with your domain.
-
Check the configuration, then reload nginx.
Terminal window sudo nginx -tsudo systemctl reload nginxnginx -tmust saysyntax is okandtest is successful. -
Open
https://music.example.comin a browser.
/etc/nginx/conf.d/musonic.conf:
# "Connection: upgrade" only for WebSocket requests.map $http_upgrade $connection_upgrade {    default upgrade;    ''      close;}
server {    listen 80;    listen [::]:80;    server_name music.example.com;    return 301 https://$host$request_uri;}
server {    listen 443 ssl;    listen [::]:443 ssl;    server_name music.example.com;
    ssl_certificate     /etc/letsencrypt/live/music.example.com/fullchain.pem;    ssl_certificate_key /etc/letsencrypt/live/music.example.com/privkey.pem;
    location / {        proxy_pass http://127.0.0.1:4533;        proxy_http_version 1.1;
        proxy_set_header Host $host;        # The visitor's real address, replacing anything it sent.        proxy_set_header X-Forwarded-For $remote_addr;        proxy_set_header X-Forwarded-Proto $scheme;        # Only Cloudflare may set this header: an empty value removes it.        proxy_set_header CF-Connecting-IP "";
        # WebSocket (/v1/events): live sync and Musonic Connect.        proxy_set_header Upgrade $http_upgrade;        proxy_set_header Connection $connection_upgrade;
# Audio sent as it comes; long songs and open WebSockets. proxy_buffering off; proxy_read_timeout 1h; proxy_send_timeout 1h; }}| Lines | Why |
|---|---|
map … $connection_upgrade |
Asks the server to switch to WebSocket only when the visitor asks for it. |
The first server block |
Sends http:// visitors to https://. |
ssl_certificate… |
The certificate from certbot. |
proxy_http_version 1.1, Upgrade, Connection |
Needed for WebSockets. |
X-Forwarded-For $remote_addr |
The real address, not $proxy_add_x_forwarded_for, which would keep what the visitor sent first. |
proxy_buffering off |
Sends audio right away. |
proxy_read_timeout 1h |
Keeps long streams and WebSockets open. |
Cloudflare Tunnel
Section titled “Cloudflare Tunnel”A tunnel needs no open port: a small program, cloudflared, on the server machine connects to Cloudflare, and Cloudflare sends your visitors through it. Cloudflare handles HTTPS and sets CF-Connecting-IP itself.
-
Add your domain to Cloudflare.
Your domain must use Cloudflare’s name servers (Cloudflare explains how when you add it).
-
Create a tunnel in the Cloudflare dashboard.
In Zero Trust, open the Tunnels page (under Networks), click Create a tunnel, choose Cloudflared and give it a name.
-
Install
cloudflaredon the server machine with the command Cloudflare shows.Choose your system and architecture, and run the command on the server: it installs
cloudflaredas a service, linked to your tunnel. -
Add a public hostname:
music.example.com→http://127.0.0.1:4533.Subdomain
music, your domain, service type HTTP, URL127.0.0.1:4533. Save. -
Open
https://music.example.comin a browser.
WebSockets go through Cloudflare without settings. Cloudflare closes connections idle for 100 seconds; the server’s ping every 30 seconds keeps live sync open. Cloudflare’s documentation: developers.cloudflare.com/cloudflare-one/connections/connect-networks.
Tailscale (private access)
Section titled “Tailscale (private access)”Tailscale links your devices in a private network: the server is never on the public internet, only your devices (and the people you share it with) reach it.
-
Install Tailscale on the server, and sign in.
Terminal window curl -fsSL https://tailscale.com/install.sh | shsudo tailscale upOpen the link it shows, and sign in to your Tailscale account.
-
Install Tailscale on your phone and computers, with the same account.
From tailscale.com/download.
-
Turn on HTTPS in the Tailscale admin console.
On the DNS page: turn on MagicDNS, then HTTPS Certificates.
-
Serve Musonic on your private network with HTTPS.
Terminal window sudo tailscale serve --bg 4533It prints an address like
https://<machine>.<tailnet>.ts.net, passed to127.0.0.1:4533. -
Use this address in the apps.
It works from any device signed in to your Tailscale.
The Android app also accepts plain http:// for Tailscale addresses (100.64.0.0 to 100.127.255.255), but the server only listens on 127.0.0.1 by default: tailscale serve is the simplest way, and it gives HTTPS to the web player too. To let someone else in, share the machine with them from the Tailscale admin console.
Check it works
Section titled “Check it works”-
Ask for the server’s status from outside.
On a phone on mobile data (not your Wi-Fi), open
https://music.example.com/health. The page shows{"status":"ok"}. -
Sign in to the console at this address.
Create your invitations from here: their links use this address (see First start).
-
Check the live sync.
Sign in to the web player on a computer and to the app on your phone, like a song on one: the heart shows on the other at once. If it only shows after a reload, the WebSocket does not go through the proxy.
From a terminal, curl -I https://music.example.com/health must answer HTTP/2 200 (or HTTP/1.1 200).
Next steps
Section titled “Next steps”- First start: invite people with your final address.
- Sign in to a server.
- Privacy and network.